Showing posts with label Pinterest. Show all posts

Monday, January 7, 2013

Pinterest Experiment 1: DIY liquid hand soap

My mom and I are always being inspired by all of the neat "life hacks" that we see on Pinterest, so we are making an effort to give one an honest try every two weeks!

[Insert your standard college-student-on-a-budget spiel here.]

So when I saw this idea on Pinterest to make a ton of hand soap for a lot less than one can buy it, I was stoked! Furthermore, I am unbearably finicky when it comes to choosing soap. I can never find a scent I like in liquid soap, but there are tons of bar soaps that I enjoy.

Because I haven't done this before, I wanted to try to make 1/4 the volume that the original pinner had made so that I wouldn't waste too much if the experiment went horribly awry.


I started by gathering my ingredients and supplies.


Start by grating the chee- uh, soap. This step was very enjoyable, as my hands smelled delightfully pepperminty afterward.


Combine the water, soap shavings, and glycerin in your pot.


Stir on low/medium for a few minutes until everything dissolves together. Then wait for it to cool.
During this time, I cleaned up my kitchen and made a label for my container.


Pour the cooled soap into a holding container. 
Bonus points if you reuse a container that you would have otherwise tossed out or recycled.


Done!

I found that this soap is pretty runny - like, I have to exercise caution when pumping it out of my dispenser or else it'll shoot all over the counter. However, I also noticed that it had thickened a little after several hours, so perhaps it will continue to thicken as time goes on.

This soap leaves my hands feeling clean and smelling minty! I give this project a B for the runniness; if you can think of a way to thicken it more easily, leave me a comment.

Saturday, September 29, 2012

Pushpin & Yarn Tree

As my apartment goes, one of my priorities is to make sure that everything is well-decorated and interesting. But because I like my space to reflect its inhabitants, this is a long process. I've been here a year and I'm nowhere near done!

But today I checked a project off my to-do list that has been there for about a year: imitate this cool piece of art.

(Click image for original post)

My bathroom has a lot of trees, birds, and cool colors - so I decided to make a small version of this tree in there.


My weapons.


My land to be conquered.

Watch my tree grow!


Done!


I love how this fills up the space - and how the reflection looks in the mirror!

Plus, now some of my vinyl birds have a place to nest. :)

Thursday, September 20, 2012

His & Hers Fish Paintings

I've been looking for more art to fill my office wall, and when I saw this idea on Pinterest, I thought it would be great to make my own!


I'd link you to the original DIY, but unfortunately I couldn't find a working link. Here is OP's blog.

The pin said to use Elmer's Glue or Puff Paint, but I wanted some extra dimension so I used hot glue. I also decided to use two of our favorite colors on each painting instead of one.


Here is what I made! I seem to have started a fish motif in my apartment, and I wanted to continue that with this project.


For Kenny, a narwhal in purple and blue. 


And for myself, a koi in red and orange.

I really love how these turned out! What do you think?

Wednesday, September 19, 2012

Pop Tab Bracelet

I have a very large number of pop tabs that I've been collecting in a cup for the last two years or so. I keep seeing cool pop tab projects and getting inspired, but I haven't done anything with them yet.

So when I saw this project on Pinterest I figured, that can't be too difficult, right?


Well, it definitely took some noodling out. The video that they included in their post was very helpful!

Here's what I made:


I figured that bright orange would be great for school spirit functions. ;)
(Go Beavs!)

Tuesday, September 18, 2012

My Eco-Easy Wall Art

This idea has been floating around on my Arts & Crafts board for quite a long time, but I've finally completed it!

Here is the original:


And here's what I came up with!


I chose light mint for my all-over color and added in bursts of yellow and purple.

It took a LONG time to collect all of the toilet paper rolls - and my awesome mom contributed MANY - but I think it looks great!

Plus, it has filled a big visual void on my wall. Yay!

Sunday, August 19, 2012

Fit Fund

Today I was in the mood for another Pinterest cleanup.
This time I decided to merge two ideas that I really adore!

  
(click the images for the DIY instructions!)

I really liked the idea of a workout tip jar. I have several fitness goals to attain, and I like the idea of being able to fit into a smaller pair of jeans and already having some money put aside for them! And, those colorful glass jars are just too cool.

This is what I made:


Recognize that snazzy font? Same one I used for my recycling and compost bins! I love continuity ;)
Plus, I was able to reuse a cool-looking glass spaghetti sauce jar. Awesome!

And, as you can see, I've already made good use of it! Ah, I can hear those new jeans calling already.

Sunday, August 12, 2012

Living room cleanup meets Pinterest cleanup!

My partner and I love our video games, so it's not uncommon for our coffee table to look like this:


So when I was looking for something to keep my hands busy, I remembered this really cool newspaper basket that has been haunting my "Arts & Crafts" Pinboard for quite some time and thought it would be a great solution!


I was really excited to use some of the newspaper that I had leftover from making my compost bin. I also like that it doesn't take many materials to complete this project!


I cut the paper at the fold and kept folding the paper long-ways and slicing until I had many strips of newspaper.
The tutorial said that it would be easy to complete this part using a rotary cutter & mat. I don't do the kind of projects that necessitate these tools (yet), but I agree that it would have made this part easier!


The initial weaving part was made easier by dotting glue where the strips of paper met.


When it came time to build up the sides, I had to extend my weaving area by gluing more strips on outward.


Ta-da! Perhaps a little more wobbly-looking than the original, but I think that it's really cool!


And, it definitely gets the job done! Much better.

Thursday, August 9, 2012

Crafting FAIL ... Purchase WIN!

Andie and I saw these beautiful DIY lanterns on Pinterest and we really wanted to try to make them.

            
(click on each photo to see their DIY instructions!)


So we get all of our supplies together ... we apply string and doilies to balloons ... we let them dry ... we pop them, AND-


But we decided not to sacrifice our lantern dreams. So we went to one of our favorite downtown stores, Mod Pod, where we had seen some paper lanterns before, and...


The takeaway: You win some, you lose some.
And I think we ended up winning anyway. :)

Tuesday, August 7, 2012

Rag Rug!!

Ever since I saw this tutorial on Pinterest, I have really been wanting to make a rag rug!

So over spring break, Mom and I gathered materials to make rugs together. Her rug was completed soon after I went back to Corvallis. I, however, took my sweet time ... but four months later I finally summoned the gusto to do it!


So here's my little tutorial.

What you need:
-A huge crochet hook. I got my size Q one from Michaels for about $2
-Pleeeenty of fabric. You could use shirts, but when you cut the fabric like that it takes ages so I suggest using old sheets. I bought fabric/sheets from various thrift stores (and I raided Mom's stash!) which totaled about $6.
-Scissors (for cutting off ends)
-Time. Mine took 10-12 hours total for a 3 1/2 - 4 foot rug.

Let's begin!

1. Gather your fabric. I used a variety of textures, but I really REALLY  recommend sticking to woven fabric like sheets. Then, instead of having to cut your fabric (labor intensive!!!) you can snip and rip.

 2. Cut or tear your fabric and roll it into balls. I made my fabric into about 1" strips. I would snip into my fabric, tear until I almost reached the other edge, then flipped, snipped, and ripped again. This way I was able to make one long strip from a big rectangle of fabric.

For me, this part took about 5 hours by itself. I imagine I could have reduced my time by at least an hour if I had used all woven fabrics that I could rip, rather than some knit that I had to cut all the way.

3. Start crocheting in the round! I single crocheted so that the holes wouldn't be too big. Here is a good tutorial for crocheting in the round.

 4. At this point you're going to want to turn on a TV show and watch it as you work. This takes hours and hours, but it's a fabulous project if it's a hot day and you don't feel like moving much!

 5. Fasten off - you're done!

Mine turned out big enough that I can sit on it with plenty of room. It currently hangs out in my living room, but it is a fantastic size for if I want to move it into my kitchen, hall, or bedroom!

Wednesday, July 18, 2012

A for Awesome!

Finally - time to talk about a craft project!


My friend Andie recently moved into a new apartment. I wanted to give her a small housewarming gift to commemorate the occasion!

I saw a tutorial for crayon monograms on Pinterest and thought they were super cute. Since my friend is a very bright & shiny person, I thought that she would enjoy something like this!
The project itself took about an hour to complete and I think it's a fun activity for beginner and expert crafters alike. If you have an occasion, try it out!

Friday, June 15, 2012

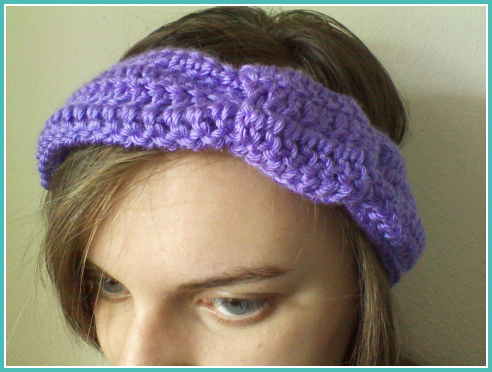
Knotted Headband

I found some super-sweet crochet headbands on Pinterest a while back, and I had to make one for myself! I chose Caron Simply Soft Brites in Grape for mine - I dig an electric purple.


Pinterest linked me to All About Ami, which gave great directions on how to make this cute accessory. The original poster's friend bought a similar headband for about $15 USD, and I was happy to make it with yarn I had on-hand!


I realize now that I should have followed the directions a little more closely. The blog said to chain 70, but since it didn't look it'd be big enough, I threw on an extra 10. It fits well around my melon, but I'd prefer for it to stretch and cling. Something to remember for next time!