Showing posts with label crochet. Show all posts

Thursday, December 20, 2012

My Most Ambitious Project Yet!

This year, my friend Amanda wanted to give her boyfriend Nick a likeness of his dog Luke for Christmas - so she came to me for help. And of course I was happy to help!

She was looking for a very cuddle-able puppy-sized stuffed toy. I haven't made anything quite like that before, but when I finally put yarn to hook, it took me maybe seven hours total to complete.


Look at that face. :)

Nick brought him home to meet the actual Luke and sent me this picture:


Awwww!

Friday, September 7, 2012

J & L Adventure 6: Plastic tote bag!

Lindsey showed me this fun recycling project on Etsy, and we knew we had to try making it.


We each used around 16 plastic bags. This is what I came up with!


Here's the rundown:

  • I used a bigger hook - they used a K and I used a Q - so the stitches were much bigger (and the project certainly much faster). I also did single crochet rather than half double crochet.
  • Different color plarn leads to a different color bag. I like the look of mine!
  • Their handles come up off the bag, whereas mine are kind of built into the bag. I was worried that any kind of heavy object might cause the thin handles to stretch and warp, so I wanted it to be a little sturdier. To achieve this, about three rows from the top I skipped a few stitches and did a few chains in their place, then continued stitching. It effectively made a hole that is a good, sturdy handle.
  • My bag is a little smaller than theirs. I think they probably used 20-25 bags while I used around 16.

I don't know how I'll end up using this bag, but it sure is cute! I'm open to suggestions ;)

Tuesday, August 7, 2012

Rag Rug!!

Ever since I saw this tutorial on Pinterest, I have really been wanting to make a rag rug!

So over spring break, Mom and I gathered materials to make rugs together. Her rug was completed soon after I went back to Corvallis. I, however, took my sweet time ... but four months later I finally summoned the gusto to do it!


So here's my little tutorial.

What you need:
-A huge crochet hook. I got my size Q one from Michaels for about $2
-Pleeeenty of fabric. You could use shirts, but when you cut the fabric like that it takes ages so I suggest using old sheets. I bought fabric/sheets from various thrift stores (and I raided Mom's stash!) which totaled about $6.
-Scissors (for cutting off ends)
-Time. Mine took 10-12 hours total for a 3 1/2 - 4 foot rug.

Let's begin!

1. Gather your fabric. I used a variety of textures, but I really REALLY  recommend sticking to woven fabric like sheets. Then, instead of having to cut your fabric (labor intensive!!!) you can snip and rip.

 2. Cut or tear your fabric and roll it into balls. I made my fabric into about 1" strips. I would snip into my fabric, tear until I almost reached the other edge, then flipped, snipped, and ripped again. This way I was able to make one long strip from a big rectangle of fabric.

For me, this part took about 5 hours by itself. I imagine I could have reduced my time by at least an hour if I had used all woven fabrics that I could rip, rather than some knit that I had to cut all the way.

3. Start crocheting in the round! I single crocheted so that the holes wouldn't be too big. Here is a good tutorial for crocheting in the round.

 4. At this point you're going to want to turn on a TV show and watch it as you work. This takes hours and hours, but it's a fabulous project if it's a hot day and you don't feel like moving much!

 5. Fasten off - you're done!

Mine turned out big enough that I can sit on it with plenty of room. It currently hangs out in my living room, but it is a fantastic size for if I want to move it into my kitchen, hall, or bedroom!

Saturday, July 28, 2012

Finger puppet buddies!

For our latest AuralArtists challenge, me and my chicks are making puppets. I completed the challenge by crocheting finger puppets!

From left to right: me, Mom, Julie, Jeanne

I really enjoyed the challenge because it involved making something completely different than the hats, headbands, scarves, and other accessories that I'm used to. It requires a bit of dexterity!

Here's how to make a finger-sized puppet base to which you can add details to your heart's content.

What you need:
-Size F-5 hook
-Whatever yarn you have around - I used regular US worsted weight stuff. This is a great project to do if you want to use up leftover yarn balls.
-Scissors

How to do it:
Row 1: Ch 10. Measure around your finger to see if it reaches. My fingers are a pretty small, so you may want to ch up to 15. Join together when you've reached a good length.
Row 2: Ch 1. Sc off the chs in a circle, as many sts as you chained (so for me, 10). Join.
Repeat Rows 3-9
Rows 10-11: Sc 1, red 1 (x5 for me)
    in other words, sc in hole 1, skip hole 2, sc in hole 3, sc in hole 4, skip hole 5, sc in hole 6...
Row 12: Join every second st using a sl st until closed. Finish off.

Hopefully those directions are clear enough. Comment if you have questions, or if a video would be helpful, I can try to make one of those as well! Have fun!

You'll notice that the octopus on the left is different than the others. I learned to make small octopi a while ago, and I adapted the pattern in this tutorial to make it a small finger puppet! Unfortunately, making eight legs made it too big for a finger - so this little gal only has five legs.

Okay, that's it for now! :)

Friday, July 27, 2012

Rosette Headband

Yes, I know, ANOTHER headband!


Believe it or not, this project has actually been on my Works-In-Progress list since last winter. I wanted to figure out how to make the base, and when I did, I didn't know how to decorate it to make it look finished.


Then I found this rosette pattern and thought that it was adorable! Finally I figured out how to finish the headband.

I love crossing projects off of my list!

Man, I love making stuff

I was asked to make a super special custom hat for an anniversary gift!

The recipient is a big League of Legends fan, so the hat was supposed to look like Recon Teemo here:


Cute fella, huh? This is what I came up with:

(Click for full-size image)

I call it a SUCCESS! :D

Friday, June 15, 2012

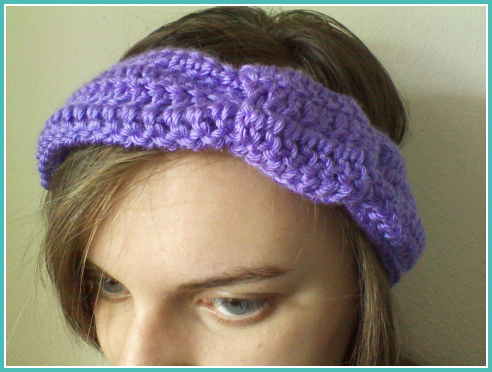
Knotted Headband

I found some super-sweet crochet headbands on Pinterest a while back, and I had to make one for myself! I chose Caron Simply Soft Brites in Grape for mine - I dig an electric purple.


Pinterest linked me to All About Ami, which gave great directions on how to make this cute accessory. The original poster's friend bought a similar headband for about $15 USD, and I was happy to make it with yarn I had on-hand!


I realize now that I should have followed the directions a little more closely. The blog said to chain 70, but since it didn't look it'd be big enough, I threw on an extra 10. It fits well around my melon, but I'd prefer for it to stretch and cling. Something to remember for next time!